2. Container registry
We have an internal container registry (like a private docker hub) which can be used for the publishing of OCI Container images for use on University compute facilities such as the HPC and Condor clusters.
The registry is only accessible from the University Network (It’s not publicly available on the internet).
Currently images published to the registry are public, therefore anyone can pull any container images stored there.
2.1. Viewing the Registry
The registry has a web interface that can be used for browsing the images currently published there.
https://container-registry.surrey.ac.uk
You will need to log in with your University of Surrey credentials.
This is a good way to see what container images are available. Especially useful for checking your own images and image tags.
2.2. Image retention policies
In the interest of being efficient with disk space there are weekly garbage collection processes running on the registry. This means that the registry will remove old and redundant images.
Garbage collection (image deletion) is based on the following policies:
image tags |
deleted? |
|---|---|
‘latest’ |
no |
any custom tag |
no |
no tags applied |
yes, upon weekly garbage collection |
only a “SHA_*******” tag applied |
yes, upon weekly garbage collection |
Note
the “SHA_*******” tag is a default tag applied by the GitLab CI pipeline when publishing images to the registry it can be used for referencing when you want to test an image but should not be used longer term.
If you have an image you wish to retain on the registry long term you will need to ensure it is appropriately tagged.
The ‘latest’ tag can only be applied one version of your container image i.e. latest version of your container image.
For more information on image tagging and how to tag your images see Tagging container images
Caution
The amount of space your container images are consuming will be monitored and you may be asked by IT services to remove some containers in the future if disk usage becomes excessive.
2.3. Creating and publishing custom container images
You may want to create your own custom Docker images specific to your own needs. This image can contain specific libraries or software that you need to run your job that might not be typically available in the standard environment of the HPC or Condor execute nodes.
Prerequisites:
Docker:
You will need a personal device or an un-managed device, because to use Docker services, you need sudo privileges.
Have a working understanding of Docker: https://docs.docker.com/
Git:
Have a working understanding of Git: https://git-scm.com/doc
Request access to the Surrey Shared Containers GitLab group: https://gitlab.surrey.ac.uk/surrey-shared-containers.
This can be done by visiting the above link, logging in with your Surrey account and clicking the request access button.
You can view a list of all published images at https://container-registry.surrey.ac.uk
Example scenario
Note
If you don’t understand what a Docker Container and/or a Docker Image are, you don’t meet the prerequisites.*
We are doing Deep Learning for Computer Vision, with CNNs (like ResNet or VGG).
We want fast results, so we will need to leverage GPUs for training, which means using CUDA.
Our entire model fits in VRAM (GPU RAM), but the Input Pipeline we designed is running on CPU and uses RAM.
We also know that we can in some ways distribute the Input Pipeline computation over several CPUs.
This will make our training faster and more efficient, which is good, and also save some polar bears and trees, which is even better.
The libraries that are needed to achieve our goal:
Ubuntu 22.04
CUDA 11.0
cuDNN 8
A BLAS, that enables multi-threading on CPU, e.g.
OpenBLAS
Intel MKL
Solution
If all of these things are installed on your own computer, you are good to go.
But when you are running a job on Condor or HPC, it is not running on your own computer!
What we need to do is create a Docker image that contains all of the above, so you can run your job inside a container that has everything your job needs.
Once you have a valid docker image, you need to publish it to an image registry so it can be downloaded for use.
Below you can see examples of how to add the image to our internal container registry, other public registries can also be used.
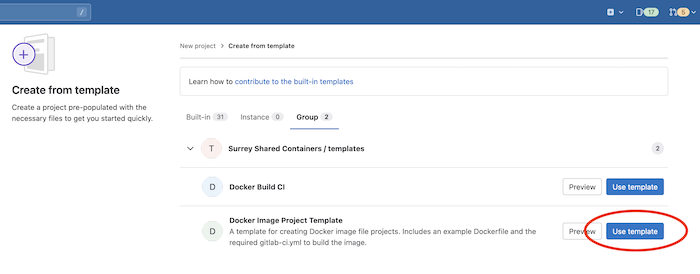
2.3.1. Create a Dockerfile project on GitLab
In order to publish an image to Surrey’s container registry you will need to create a Dockerfile project on gitlab.
Simply join the Surrey Shared Containers GitLab group: https://gitlab.surrey.ac.uk/surrey-shared-containers group, and create a New Project.
We have created a template to use to help you get started. This can be found under the Group section after choosing “Create from template” on the new project page. The template is called “Docker Image project template”.
This template will create an example Dockerfile and the required .gitlab-ci.yml file used for building and pushing your image to the Surrey container registry.
2.3.2. Create a custom Dockerfile
https://docs.docker.com/engine/reference/builder/
Docker can build images automatically by reading the instructions from a Dockerfile.
A Dockerfile is a text document that contains all the commands a user could call on the command line to assemble an image.
  #Use the base image from nvidia/cuda.
  FROM nvidia/cuda:11.8.0-cudnn8-runtime-ubuntu22.04

  #Install special software or additions
  #Udate the package database
  RUN apt-get update -y
  #Install the BLAS
  RUN apt-get install -y    libopenblas-dev
  #To keep the Docker image as small as possible
  RUN apt-get autoremove -y && apt-get autoclean -y

  #Exposing of ports and specifying a start command - Not necessary
  #If you want certain ports from inside the container exposed
  EXPOSE 5000
  #The command that will run  by default when container is started. If this is specified, cmd in condor submit file can be omitted.
  CMD /usr/bin/hostname
You will want to build your image and to run a container to verify if everything is working as expected!
See https://docs.docker.com/engine/reference/commandline/build/
Once you have created this Dockerfile and stored it in a git project you can in theory rebuild your custom container image at any time. This is excellent for Research reproducibility.
2.3.3. Publishing images to the registry
The GitLab project template in the Surrey Shared Containers group includes a gitlab-ci.yml file. It ensures that your image is building correctly and if so, it will be published to the image registry server, making it available for yourself and any other users.
https://gitlab.surrey.ac.uk/surrey-shared-containers/templates/docker-image
On GitLab:
Create your own project in the Surrey Shared Containers group by going to the group at https://gitlab.surrey.ac.uk/surrey-shared-containers and clicking on New project
Choose Create from template
Choose the Docker image project template - This will give you the basic project skeleton for creating a custom docker image and uploading it to the surrey-containers registry.
On your computer:
Clone your new project
Edit the Dockerfile
Commit your changes
Push your commits up to gitlab
Note
Alternatively you can use GitLab’s built in web IDE to make changes directly on the project from within your web browser
On GitLab:
From your project, go to CI/CD -> Run Pipeline -> Run Pipeline
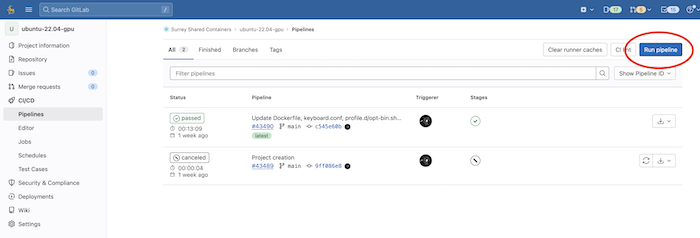
on the run pipeline screen leave all the options at their default values and just click on Run pipeline
If the build succeeds, your image will be available at container-registry.surrey.ac.uk/shared-containers/<container-name>
Note
If you pushed you Git changes to the main branch then the image will be tagged with ‘latest’ otherwise it will be tagged with the commit ref slug.
You can now pull your custom container image for use in your Condor Job
2.3.4. Tagging container images
Tags are mutable named references to specific versions of container images. There are many reasons and benefits for using tagging. This article has a pretty good summary of what container tagging is and why they should be used: https://blog.atomist.com/docker-image-tags/
We are using tags as a way of identifying important versions of containers that need to be stored on the registry. You can use tags as a way of identifying specific versions of your containers as you iterate and change them.
2.3.4.1. How to tag container images with GitLab
Within the (Surrey Shared Containers) group, We are using the gitlab CI pipeline to convert a git commit tag into a tag for your container image when published to the registry. Simply tag a commit and that version of your container image will be published to the registry with the same tag applied.
For more info on Git tags: https://git-scm.com/book/en/v2/Git-Basics-Tagging
latest
any commits merged or pushed into the
mainbranch on your container project will be automatically tagged with thelatesttag by the CI pipeline.Any subsequent times you commit or merge to the
mainbranch a new version of your container image will be built and published to the registry and thelatesttag will be moved to this new version. Remember only one version of your container can have thelatesttag.custom tags
You can also apply custom tags to your docker image by using the Git tag feature on GitLab.
You can create a tag from a branch under Repository -> Tags you can also tag a specific commit under Repository -> Commits
select the commit you wish to tag and then Options -> Tag
The tag you apply to the commit in your project is what will be applied as the tag when the GitLab pipeline publishes the container image to the registry.
We advise you to use sensible conventions for tagging your images. Perhaps you want to use a numerical versioning system like
v.1.0.0or perhaps you want to have astabletag to track the latest stable version of your container image.You can then reference these applied tags to pull this specific version of your container image:
container-registry.surrey.ac.uk/shared-containers/<container-name>:<tag>
2.4. Migrating docker images from the old docker-image-registry
If you have docker images in the old docker-image-registry.eps.surrey.ac.uk that you want to bring over
to the new container-registry.surrey.ac.uk you can do so by following one of these migration processes.
2.4.1. The quickest way (no commit history)
If you are not concerned about retaining the full commit history of your git project and just want to migrate the latest version of your docker image to the new registry you can:
Join the Surrey Shared Containers gitlab group https://gitlab.surrey.ac.uk/surrey-shared-containers
follow the instructions on how to Publishing images to the registry and copy your Dockerfile into the new project.
update any condor submit files for jobs that pull your image to reference the new location to pull the container
docker_image = container-registry.surrey.ac.uk/shared-containers/<container-name>:<tag>
2.4.2. The “I want to retain my commit history” way
At a high level this process consists of:
Join the Surrey Shared Containers gitlab group https://gitlab.surrey.ac.uk/surrey-shared-containers
fork your gitlab project over to the new surrey-shared-containers group on Gitlab
replace the gitlab-ci.yml file with the new gitlab-ci.yml file
trigger a run of the gitlab CI Pipeline to publish your image to the registry
update any condor submit files referencing your container image
Your image will be rebuilt and pushed to the new registry where it can now be pulled and used.
2.4.2.1. Join the Surrey Shared Containers gitlab group
Log into gitlab and ensure you’re a member of the surrey-shared-containers group. https://gitlab.surrey.ac.uk/surrey-shared-containers
Note
You need to be a member of this group before you will be able to create new projects in it, or move existing projects over to it.
It can be found at the above link but is also available when browsing public groups.
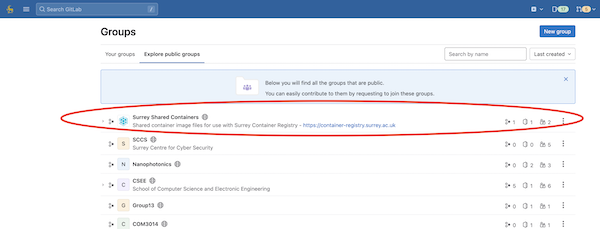
surrey-shared-containers listed in public groups
if you’re not already a member, click on Request access and your request to join the group will be submitted and approved shortly.
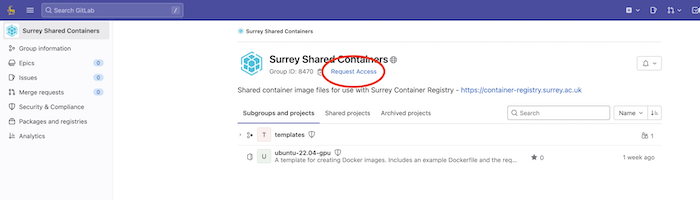
Click on request access to submit a request to join the group
2.4.2.2. Fork your project over to surrey-shared-containers group
Go to the docker file project you want to migrate https://gitlab.surrey.ac.uk/cvssp-shared-dockerfiles
on the projects main screen click on the fork button.
on the Fork Project screen under project URL, click on the dropdown menu and select “surrey-shared-containers”
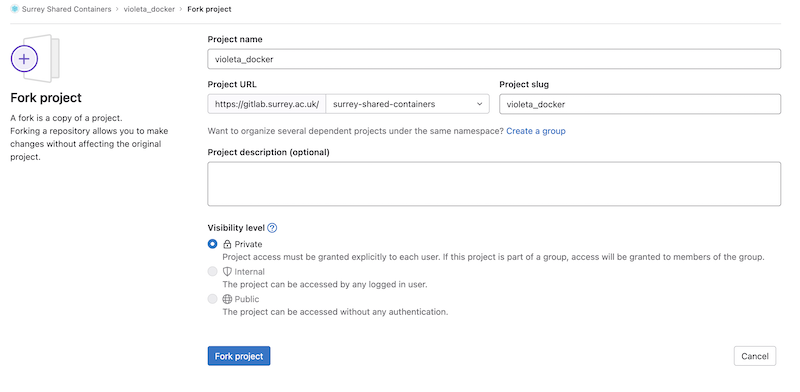
Select surrey-shared-containers from the dropdown menu and click fork project
Note
Because your project has now copied to a new group, you will need to treat it like a new project. If you have any local copies of your git Project this will still be a clone of the old project. you will need to clone this new version of the project to your local machine.
2.4.2.3. Update the gitlab-ci.yml file
You will need to replace the contents of the .gitlab-ci.yml file in your project with the following:
include:
- project: 'surrey-shared-containers/templates/docker-build-ci'
  file: 'docker-build-ci.yml'
You could achieve this in many different ways. We recommend to just copy and paste the contents into the file and commit the changes. Alternatively you could delete the old .gitlab-ci.yml file and replace It with a copy of the file from https://gitlab.surrey.ac.uk/surrey-shared-containers/templates/docker-image and commit the changes.
2.4.2.4. Run the CI/CD Pipeline (publish to the registry)
Once you have moved your project to the shared surrey containers group and updated the contents of the .gitlab-ci.yml file you can trigger a run of CI/CD pipeline which will build your container image and upload it the the surrey-containers registry.
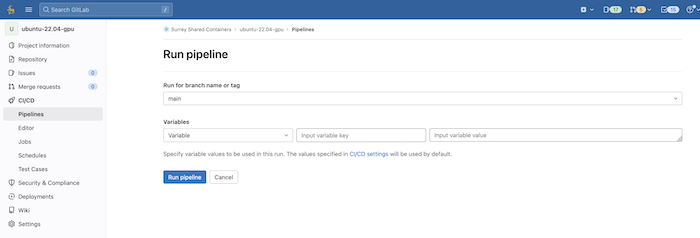
from your project click on CI/CD in the left menu.
click on Run Pipeline
leave all the options at their default values and just click on Run pipeline
Your container image will now be built according to the specification in your projects Dockerfile and will be uploaded to the container registry.
2.4.2.5. Update your condor submit files
For condor to be able to pull your container image from the new registry you will need to inform it of its new location. This means you need to update the docker line in your condor submit files to the new registry address as below
docker_image = container-registry.surrey.ac.uk/shared-containers/<container-name>:<tag>